
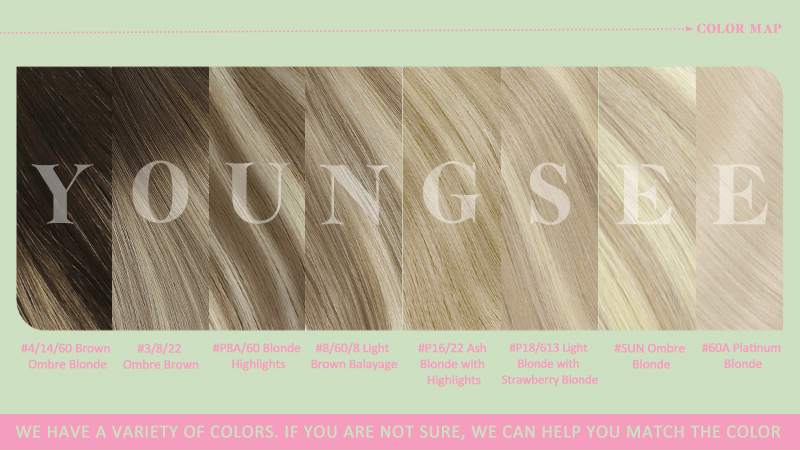
Thank you for your inquiry on how to choose the right color for hair extensions. Please send us a clear photo of your hair taken in natural light from behind, without any filters applied. This allows us to review the photo and recommend the most suitable YoungSee hair extensions color for you, ensuring a seamless blend with your natural hair.
YoungSee hair extensions can only be dyed to darker shades, except #1 Black, however, they cannot be bleached to lighter colors. Unfortunately, lightening the extensions by bleaching is not recommended as it can damage the hair structure and affect the quality of the extensions. Please ensure that if you decide to dye the extensions, you use a professional colorist to maintain the integrity and longevity of the hair.
Please do not worry, we are here to help you find the perfect match. To assist you better, could you please take a clear photo of your hair from behind in natural light, without any filters applied? This will allow us to review the photo and recommend the most suitable color for your extensions, ensuring a seamless blend with your natural hair.
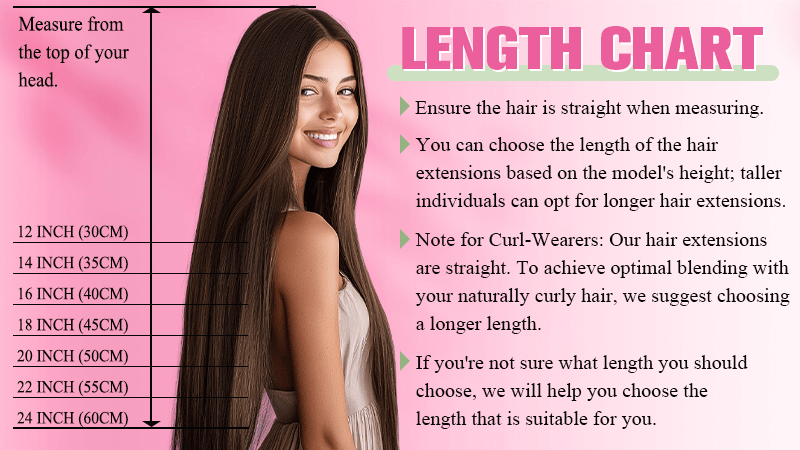
To ensure you select the perfect length, please follow these steps to measure your current hair length accurately:
1. Start with Clean, Dry Hair: Make sure your hair is clean and completely dry before measuring.
2. Brush Your Hair: Brush your hair to remove any tangles and ensure it is smooth.
3. Part Your Hair: Part your hair down the middle from the crown to the nape of your neck.
4. Pull Your Hair Forward: Pull all of your hair forward so that it falls naturally over your shoulders.
5. Measure from the Ear: Place a measuring tape at the bottom of one ear and extend it down to the desired length at the tips of your hair. This will give you the most accurate measurement of where the extensions will fall.
6. Note the Length: Record this length, which will help you determine the appropriate length for your hair extensions.
Here are some steps you can take to improve the condition of YoungSee hair extensions:
Use a Moisturizing Shampoo and Conditioner: Opt for sulfate-free, moisturizing products specifically designed for extensions. These will help keep the hair hydrated and reduce dryness.
Deep Conditioning Treatment: Apply a deep conditioning mask or treatment once a week. Leave it on for at least 20-30 minutes before rinsing thoroughly. This will help restore moisture and prevent tangling.
Brush Regularly and Gently: Use a soft-bristle brush to gently comb through your extensions starting from the ends and working your way up. Do this daily to prevent knots and tangles from forming.
Avoid Heat Styling Tools: Minimize the use of heat styling tools such as flat irons and curling wands. If you must use them, apply a heat protectant spray beforehand to minimize damage.
Silk Pillowcase: Sleep on a silk pillowcase to reduce friction and keep your extensions smooth and tangle-free overnight.
Proper Storage: When not wearing your extensions, store them in a cool, dry place and hang them to avoid tangling. You can also use a mannequin head for proper storage.
By following these tips, you should notice an improvement in the texture and manageability of your hair extensions. If the issue persists, please feel free to find us for further assistance.
Washing Frequency:
General Rule: Aim to wash your extensions every 2-3 weeks, or when they begin to feel less clean or start to tangle more easily.
Activity Level: If you engage in activities that cause excessive sweating (e.g., exercise) or if you live in a particularly dusty environment, you may need to wash them more frequently.
Use Gentle Products: Use a sulfate-free, moisturizing shampoo and conditioner specifically formulated for hair extensions. These products are gentler on the hair and help maintain moisture levels.
Washing Technique:
Pre-Wash Prep: Before washing, gently brush your extensions to remove any tangles.
Water Temperature: Use lukewarm water rather than hot water, as hot water can strip natural oils and cause dryness.
Shampoo Application: Apply shampoo gently from mid-lengths to ends, avoiding the root area where possible. Do not rub or scrub vigorously.
Conditioning: Apply conditioner from mid-lengths to ends and let it sit for 5-10 minutes before rinsing thoroughly.
Drying and Styling:
After washing, gently squeeze out excess water with a microfiber towel or soft cloth. Avoid rubbing the hair.
Allow your extensions to air dry whenever possible. If you use a blow dryer, always apply a heat protectant spray first and use a low heat setting.
Daily Care:
Brush your extensions daily using a soft-bristle brush or detangling brush, starting from the ends and working your way up.
Store your extensions properly when not in use, ideally hanging them or placing them on a mannequin head to avoid tangling.
By following these tips, you can help keep your hair extensions hydrated and tangle-free while minimizing dryness. If you have any further questions or need additional assistance, feel free to reach out anytime.
Typically, with regular wear and proper care, you can expect your hair extensions to last around 3 months. However, this timeframe can vary depending on how well they are maintained and your lifestyle factors.
To help maximize the lifespan of your extensions and keep them looking their best, here are some preventive measures and care tips:
Washing Frequency:
Wash your extensions every 7-10 wears or when they begin to feel less clean. Over-washing can lead to dryness and tangling.
Use Gentle Products:
Use sulfate-free, moisturizing shampoos and conditioners specifically designed for hair extensions. These products are gentler and help maintain moisture levels.
Proper Washing Technique:
Before washing, gently brush your extensions to remove any tangles.
Use lukewarm water rather than hot water to avoid stripping natural oils.
Apply shampoo gently from mid-lengths to ends, avoiding the root area where possible.
Apply conditioner from mid-lengths to ends and let it sit for 5-10 minutes before rinsing thoroughly.
Drying and Styling:
After washing, gently squeeze out excess water with a microfiber towel or soft cloth. Avoid rubbing the hair.
Allow your extensions to air dry whenever possible. If you use a blow dryer, always apply a heat protectant spray first and use a low heat setting.
Daily Care:
Brush your extensions daily using a soft-bristle brush or detangling brush, starting from the ends and working your way up.
Minimize the use of heat styling tools such as flat irons and curling wands. If you must use them, always apply a heat protectant spray beforehand.
Storage:
When not in use, store your extensions properly. Hang them or place them on a mannequin head to avoid tangling and damage. Keep them in a cool, dry place away from direct sunlight.
Protect from Environmental Damage:
Protect your extensions from excessive sun exposure, saltwater, and chlorine by wearing a hat or using a leave-in conditioner with UV protection when outdoors.
Cover your hair while sleeping with a silk scarf or pillowcase to reduce friction and prevent tangling.
Here are some essential tips:
Daily Brushing:
Use a soft-bristle or detangling brush. Start from the ends and work your way up to avoid pulling. Brush at least once a day, preferably before bed.
Avoid Over-Washing:
Wash every 7-10 wears using sulfate-free, moisturizing shampoos and conditioners designed for hair extensions.
Proper Washing Technique:
Gently brush out tangles before washing. Use lukewarm water and apply shampoo and conditioner from mid-lengths to ends.
Drying and Styling:
Air dry whenever possible. If using a blow dryer, apply a heat protectant spray first and use a low heat setting.
Limit the use of heat styling tools and always use a heat protectant spray when needed.
Nighttime Care:
Sleep on a silk pillowcase to reduce friction. Consider braiding your hair before bed to minimize tangles.
Protect from Environmental Damage:
Wear a hat or use a leave-in conditioner with UV protection when outdoors. Rinse thoroughly after swimming and apply a deep conditioning treatment.

Different types of extensions have different installation and removal methods. Here’s a breakdown based on the type of extensions you have:
Installation:
Start with clean, dry hair.
Section your natural hair and clip it out of the way.
Attach the wefts to your hair using the clips provided, starting from the bottom and working your way up.
Removal:
Gently unclip each weft starting from the top and moving downward.
Store your extensions in a cool, dry place to maintain their quality.
Installation:
Part your hair horizontally where you want to add volume or length.
Secure the wire along the part and weave small sections of your hair through it.
Adjust the tension to ensure a secure fit.
Removal:
Carefully unwind the sections of your hair from the wire.
Remove the wire and store the extensions properly.
Professional Installation Required
The following types of hair extensions require professional installation due to their more complex application process:
Tape-In Extensions: Applied by sandwiching thin sections of your natural hair between two tape-in wefts.
Weft Extensions: Sewn onto braided hair or attached using micro-beads.
I-Tip Extensions: Attached using micro-beads or rings that clamp onto small sections of your hair.
Micro Ring Extensions: Small rings are clamped onto individual strands of your hair.
Nano Ring Extensions: Similar to micro rings but smaller for a more discreet attachment.
U-Tip Extensions: Keratin bonds are melted and fused to individual strands of your hair.
K-Tip Extensions: Also known as keratin fusion extensions, these are bonded to your natural hair using heat.
Removal (Professional Assistance Recommended)
For these professional-installed extensions, removal should also be done by a professional to avoid damage to your natural hair. They will use specialized tools and techniques to safely remove the extensions without causing breakage or other damage.
By following these guidelines, you can ensure that your hair extensions are installed and removed correctly, maintaining both their quality and the health of your natural hair. If you have any further questions or need additional assistance, feel free to reach out anytime.